|
|
Post by Blade-of-the-Moon on Jul 30, 2011 7:12:02 GMT
Martin is a talented sculptor in his own right for sure ! ;D NICE pics too !  |
|
|
|
Post by Himmapaan on Jul 30, 2011 11:56:14 GMT
Come on now. To think, I was going to leave you all of my paleoart, in the event of my demise.  Why, Jeremy, I never knew you cared! Have I been reinstated in the legacy now? ;D |
|
|
|
Post by martingarratt on Jul 30, 2011 13:35:14 GMT
|
|
|
|
Post by Radman on Jul 30, 2011 13:46:25 GMT
Wow, simply stunning work on the Carnotaurus and base, awesome. Also, nice to see you here, Martin.  |
|
|
|
Post by postsaurischian on Jul 30, 2011 13:49:06 GMT
 Adorable!!
|
|
|
|
Post by Horridus on Jul 30, 2011 15:34:19 GMT
That's wonderful. I really think the Carnotaurus is the best Carnegie figure to date and this repaint (and 'mounting') really shows it off.
|
|
|
|
Post by Blade-of-the-Moon on Jul 30, 2011 18:25:38 GMT
Nice to see you finally joined ! ;D Yeah this is certainly a superb piece..you would have no idea it wasn't a resin kit...  |
|
|
|
Post by totoro on Jul 30, 2011 21:14:01 GMT
Jeremy; Your photos look great. Here are a few pics of the Carnegie Carnotaurus and base. 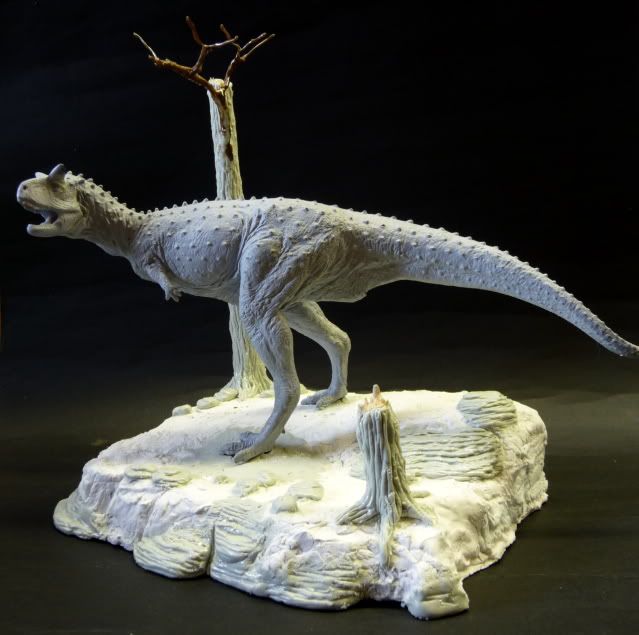 First of all, congratulations on another beautiful diorama, Martin. As with others, you've taken a nice figure and made it better. I am looking at your pre-painted base and have a few questions, if you're up for sharing your secrets. Is that mostly Sculpey or some other type of modelling clay? Also, the old snag seems to have a piece of "live" twig sticking out of it. Is that what you did there? What do you do for plants - especially the small palm leaves? Do you make your own, or do you buy them pre-made somewhere? Finally, perhaps now that you're joining the forum and posting in this thread, a mod might be able to modify it to correctly spell your name?  |
|
|
|
Post by martingarratt on Jul 30, 2011 23:04:51 GMT
[quote author=totoro
I am looking at your pre-painted base and have a few questions, if you're up for sharing your secrets. Is that mostly Sculpey or some other type of modelling clay? Also, the old snag seems to have a piece of "live" twig sticking out of it. Is that what you did there? What do you do for plants - especially the small palm leaves? Do you make your own, or do you buy them pre-made somewhere?
[/quote]
I don't mind at all; This particular base was made from a block of styrofoam, which I carved out into the shape that I wanted. I then covered the styrofoam with a suitable 'filler' this one was covered with wood filler.
The rocks and 'rock layers' were added on with 'plumbers putty' this dries in a couple of minutes so you have to be quick with the detailing.
The tree is a piece of dowling covered with milliput and detailing
added. The 'dead' twig is copper wire covered in epoxy glue and painted.
The base is then painted and dry brushed - wood glue spread over the base and ground cover added - I used tea leaves and a layer of real leaves which I had microwaved and 'crumbled' up.
The palm leaves I make out of paper with very fine wire glued to the underside to make them 'bendable' The ferns were made from an artificial plant that I cut up and glue the individual leaves together to form a small plant. I am always on the look-out for suitable artificial plants that I can utilise in the dioramas.
|
|
|
|
Post by totoro on Jul 30, 2011 23:42:51 GMT
I am looking at your pre-painted base and have a few questions, if you're up for sharing your secrets. Is that mostly Sculpey or some other type of modelling clay? Also, the old snag seems to have a piece of "live" twig sticking out of it. Is that what you did there? What do you do for plants - especially the small palm leaves? Do you make your own, or do you buy them pre-made somewhere? I don't mind at all; This particular base was made from a block of styrofoam, which I carved out into the shape that I wanted. I then covered the styrofoam with a suitable 'filler' this one was covered with wood filler. The rocks and 'rock layers' were added on with 'plumbers putty' this dries in a couple of minutes so you have to be quick with the detailing. The tree is a piece of dowling covered with milliput and detailing added. The 'dead' twig is copper wire covered in epoxy glue and painted. The base is then painted and dry brushed - wood glue spread over the base and ground cover added - I used tea leaves and a layer of real leaves which I had microwaved and 'crumbled' up. The palm leaves I make out of paper with very fine wire glued to the underside to make them 'bendable' The ferns were made from an artificial plant that I cut up and glue the individual leaves together to form a small plant. I am always on the look-out for suitable artificial plants that I can utilise in the dioramas. Wow, didn't think it was possible, but now I'm even more impressed! ;D I will have to try that technique for the palms. I am always hoping to find something that will serve as an ideal cycad or monkey puzzle tree foliage. I may just have to try making my own as you have. Some of your techniques echo those described by Ron Lemery in PT, whose work I also enjoy. Do you also use the plumber's putty for the small Krentz bases? Thanks for sharing your techniques, Martin. Your work is certainly inspiring! I'm sitting on about a dozen unpainted Krentz models and a nice Galileo piece that I am just about ready to try working up, so I appreciate the tips. Maybe someday you will do a sort of photo-essay for us? I feel confident in saying that it will be immensely well-received by the Forum!  |
|
|
|
Post by Jeremy on Jul 31, 2011 1:58:02 GMT
Great job on these two pieces Martin. It's great to hear about some of your processes, used in making these masterpieces.  |
|
|
|
Post by lio99 on Jul 31, 2011 4:51:43 GMT
There awesome!!!
|
|
|
|
Post by martingarratt on Jul 31, 2011 19:34:12 GMT
|
|
|
|
Post by Blade-of-the-Moon on Jul 31, 2011 20:04:31 GMT
Thanks Martin..now my poor little factory piece looks downright shoddy in comparison !  Seriously though it looks great..and the base really suits it ! |
|
|
|
Post by totoro on Jul 31, 2011 20:06:55 GMT
Another amazing piece Martin. Your landscapes are very imaginative and all appear very different. I'm sure that's harder than it seems. Would you consider posting some close-up photos of your plants some time? I'd love to see those in more detail to see how you create them. They look fantastic.  |
|
|
|
Post by martingarratt on Jul 31, 2011 21:34:07 GMT
Step by step base for Shane's T.rex and Ankylosaurus I've sorted out some pics of a base that I made for Shane's T.rex and Ankylosaurus; these were originally posted on the 'Clubhouse' This first pic shows the two dinos individual bases that I am utilising into this diorama, I have glued them down to a piece of MDF, put edging all the way round and drawed a line where I want the water to come to. 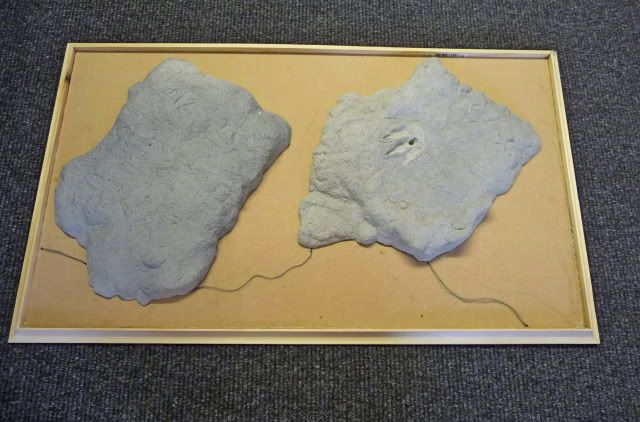 The next pic shows me squirting expanding foam inbetween the bases and up to the water line to join them together. 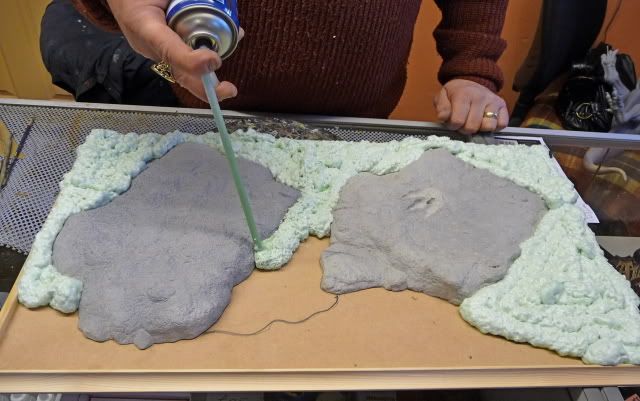 I wait for the foam to 'skin over' then press it into position. 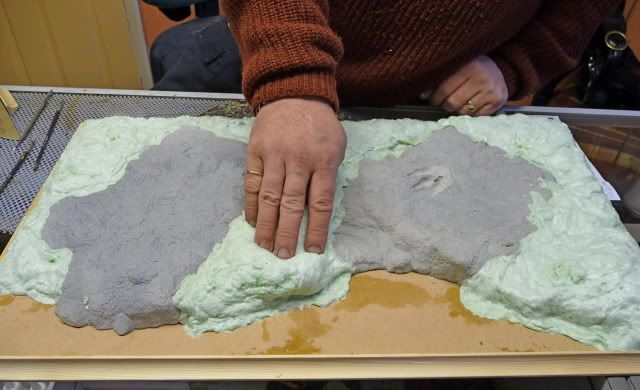 Then I cover over the foam with wood glue and sprinkle sand and tiny pebbles over for ground cover. 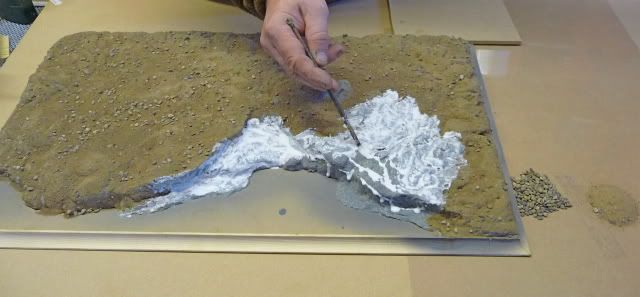 Wood glue is then spread in the river bed, I scattered tea leaves for the deeper part of the river and fine grit towards the shore line. 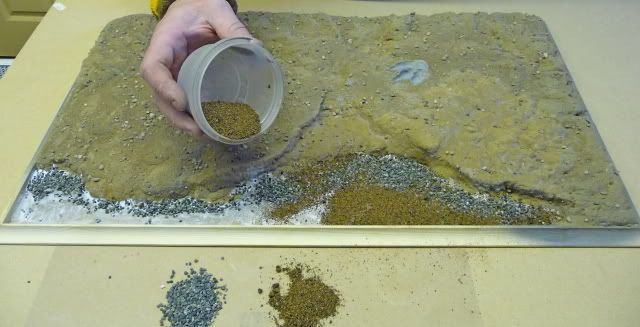 This pic shows me making some very simple ground cover plants by drawing the shape onto clear acetate, cutting out, glueing a couple of the shapes together, blob of milliput in the centre and painting. 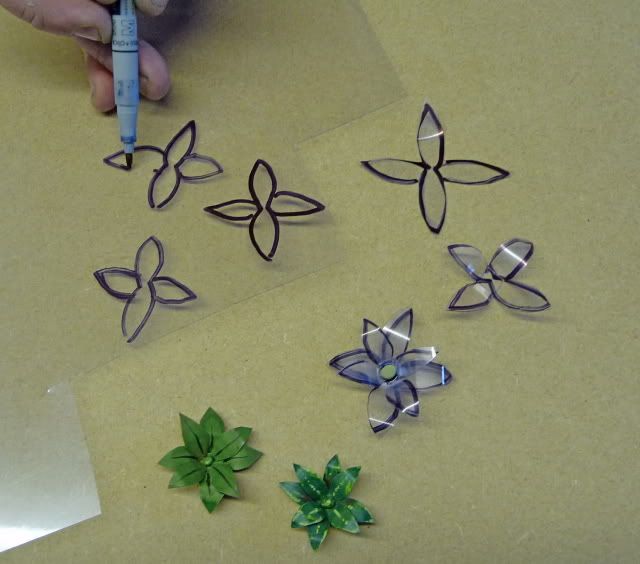 Here are a couple of pics of some artificial plants that I use. 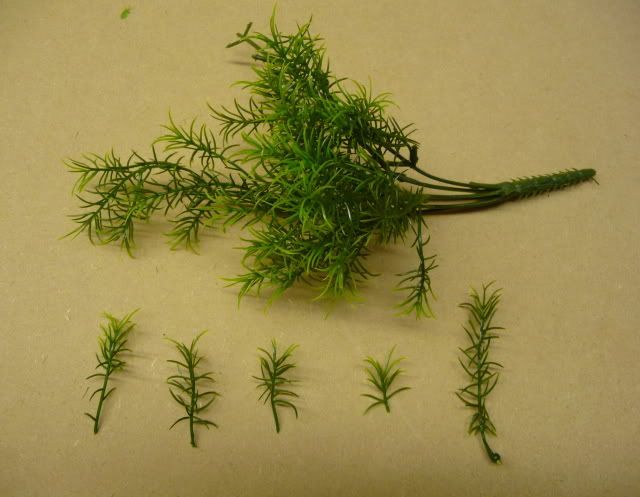 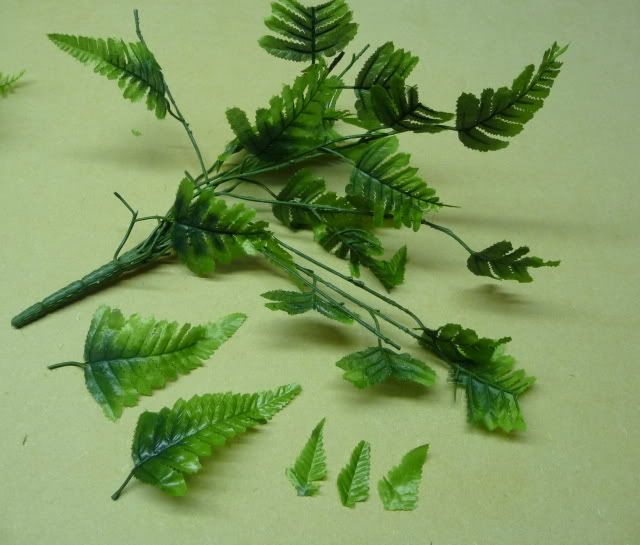 Patches of wood glue is spread over areas of sand and chopped up scenic material scattered over. 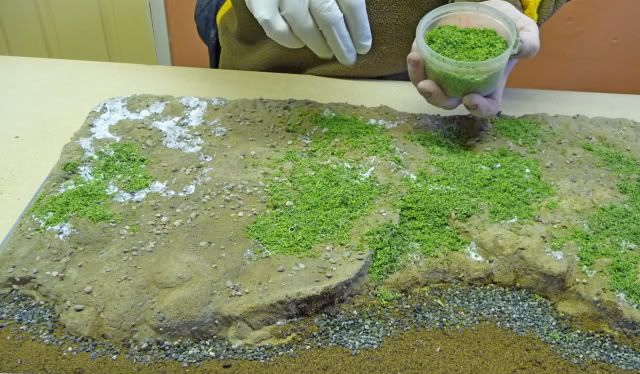 A few twigs and dead tree stump added. 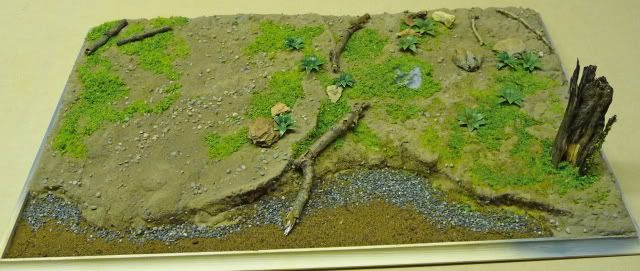 A few more plants added, the base is ready for the water, I've used a standard casting resin, a few plants at the waters edge, then as the resin is setting, I drag a screwdriver or similar object through the resin to create ripples. 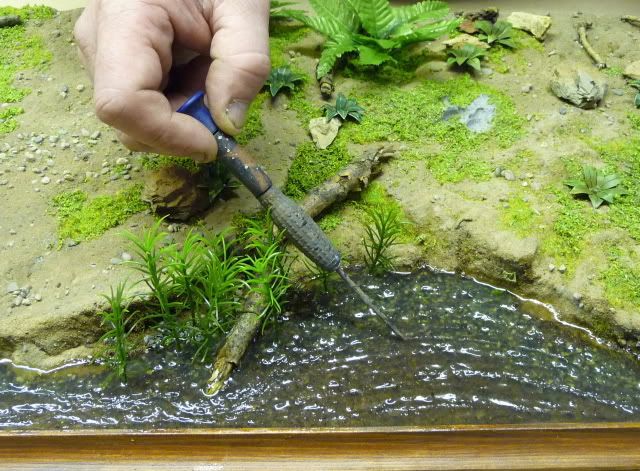 I'm now ready to populate the base, in this case Shane's T.rex and Ankylosaurus. 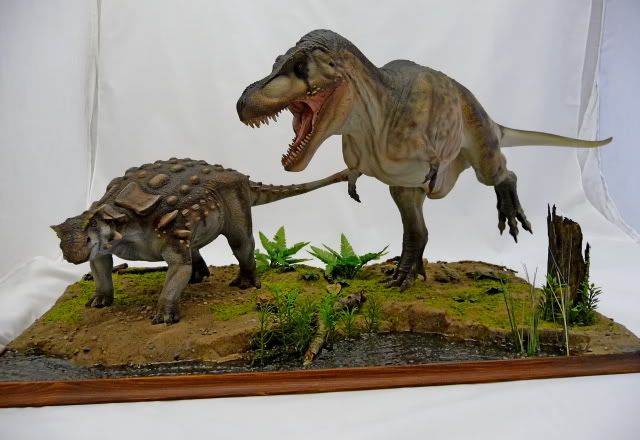 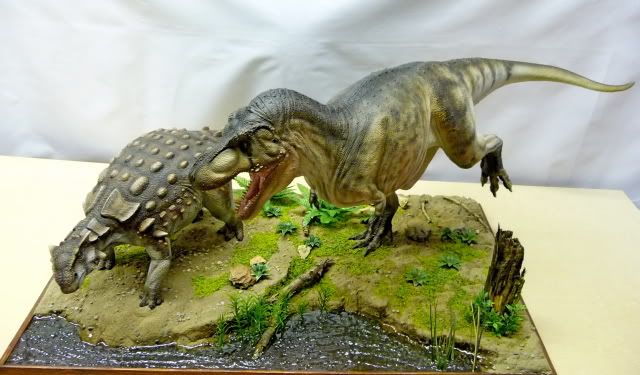 |
|
|
|
Post by Horridus on Jul 31, 2011 21:45:40 GMT
That T. rex is...quite something.
|
|
|
|
Post by totoro on Jul 31, 2011 21:47:20 GMT
Martin - you are a God! This is so cool to see, thanks for the glimpse into the process. I'm sure it just makes those that have pieces of yours appreciate them more. I'd love to see more of this if you are willing. Just fantastic.
|
|
|
|
Post by Blade-of-the-Moon on Aug 1, 2011 2:17:29 GMT
Wow..I almost feel I could try this myself. I have quite a lot of experience with expanding foam ..but from that experience you don't touch it.. lol
Though I have bumped into it when the surface was dry and the interior was still drying..pressing down didn't really do anything though. It just expanded anyway. I suppose you could place something on top of it..but wouldn't it just expand outward into other directions ?
|
|
bfler
Junior Member
 
Posts: 97
|
Post by bfler on Aug 1, 2011 9:47:50 GMT
martingarrattMay I ask how you color your models? Do you use an airbrush pistol or do you paint it with a paintbrush?
|
|